Cloudmta.Store

Uncategorized

Uncategorized

How to Enable Port 25 on DigitalOcean for Bulk Emailing

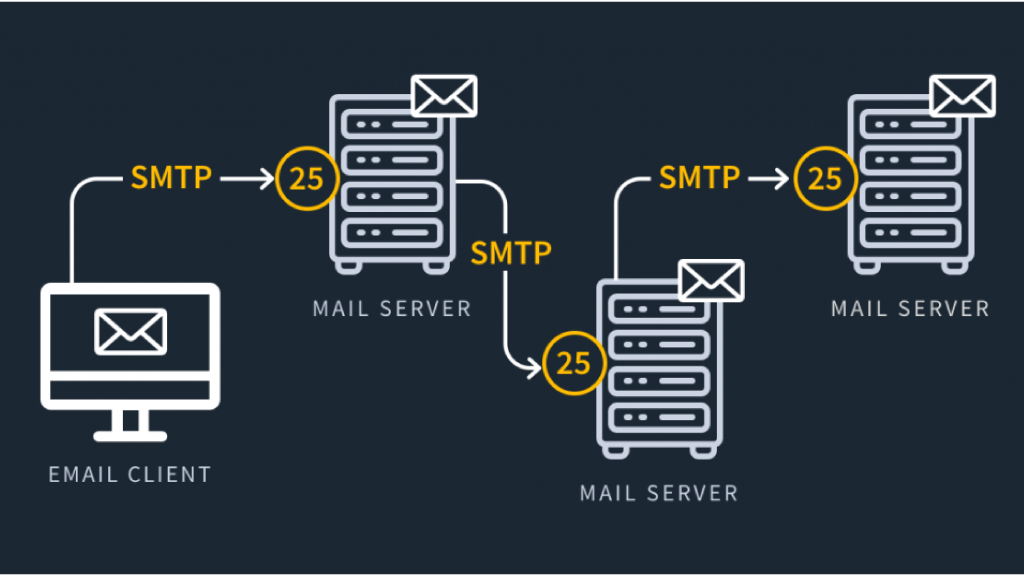
DigitalOcean, like many cloud providers, blocks outbound traffic on Port 25 to prevent spam. However, if you’re running a legitimate email marketing or transactional email service, you may need to request unblocking. In this guide, we’ll explain how to enable Port 25 on DigitalOcean and ensure smooth bulk email delivery. Why is Port 25 Blocked on DigitalOcean? Port 25 is primarily used for SMTP email delivery. To prevent spam abuse, DigitalOcean blocks outbound traffic on this port by default. If you are a verified user with a valid reason for email sending, you can request access. Steps to Enable Port 25 on DigitalOcean 1. Verify Your DigitalOcean Account Before requesting Port 25 access, ensure: Your account is verified with a valid payment method. You have a history of legitimate usage. Your emails comply with anti-spam regulations. 2. Submit a Support Ticket to DigitalOcean Go to the DigitalOcean Support Page. Click on “Submit a Ticket” and choose Networking & Security as the category. Provide the following details: Why you need Port 25 access (e.g., transactional emails, legitimate email marketing). Compliance measures (SPF, DKIM, DMARC records). Your email sending limits and usage policies. Submit the request and wait for a response (usually 24-48 hours). 3. Configure Your Droplet for Email Sending Once DigitalOcean approves Port 25 access, configure your email sending application. Ensure: Your SMTP settings are correctly configured. Your server has reverse DNS (rDNS) properly set. Email authentication methods (SPF, DKIM, DMARC) are enabled. Alternative: Use Port 587 or 465 If DigitalOcean denies your request, consider using alternative ports: Port 587: Secure SMTP submission (TLS). Port 465: SMTP over SSL (deprecated but still used). Conclusion Enabling Port 25 on DigitalOcean requires a formal request and compliance with anti-spam guidelines. If not approved, you can use alternative SMTP ports or third-party email services like SendGrid or Mailgun. More Information : DigitalOcean SMTP Documentation

Uncategorized

The Best Linode CloudMTA Bulk Email Setup for High Deliverability

The Best Linode CloudMTA Bulk Email Setup for High Deliverability Setting up a Linode CloudMTA bulk email setup is one of the most effective ways to send large volumes of emails while ensuring high inbox placement and low spam rates. If you’re looking for a reliable and cost-effective solution for email marketing, this guide will show you how to configure Linode VPS with CloudMTA step by step. This guide will show you step-by-step how to configure Linode VPS and CloudMTA for bulk email sending. Why Use Linode for Bulk Email Sending? Linode provides powerful cloud servers that offer dedicated IPs, full root access, and affordable pricing, making it an ideal choice for setting up a bulk email server. ✅ High-performance VPS for uninterrupted email sending✅ Root access to configure CloudMTA without restrictions✅ Dedicated IPs for better email reputation and inbox rates✅ More cost-effective than AWS, Google Cloud, or Azure What Makes CloudMTA Ideal for Bulk Email? CloudMTA (PMTA) is a high-performance mail transfer agent (MTA) that ensures fast and reliable bulk email delivery. ✅ High throughput SMTP server for large-scale email campaigns✅ IP rotation to maintain a good sender reputation✅ Advanced bounce processing and feedback loop handling✅ Supports SPF, DKIM, and DMARC for better email authentication How to Set Up Linode CloudMTA Bulk Email Server Step 1: Get a Linode Server with Port 25 Enabled Choose a Linode VPS with Port 25 open for SMTP emails. Buy it here: Linode Cloud Accounts with Port 25 Deploy a Ubuntu or CentOS server for better compatibility with CloudMTA Step 2: Install CloudMTA on Linode Connect to your Linode VPS using SSH Download PowerMTA and install it using package manager Configure multiple IPs, DKIM signing, and SPF records Step 3: Set Up SMTP & Authentication Add SMTP details in your email marketing software Authenticate your domain with SPF, DKIM, and DMARC Set up reverse DNS (rDNS) and warm up your IPs Best Practices for Bulk Email Success 🔹 Warm-up IPs before sending high email volumes🔹 Use proper domain authentication (SPF, DKIM, DMARC)🔹 Monitor email delivery and adjust settings accordingly🔹 Rotate IPs and domains to prevent blacklisting Final Thoughts Setting up a Linode CloudMTA bulk email server allows you to send thousands of emails daily without deliverability issues. With the right configurations and best practices, you can achieve excellent email inbox placement for your campaigns. Docs : Linode Documentation

Uncategorized

📢 How to Send Bulk Emails Using Linux Servers with…

📢 How to Send Bulk Emails Using Linux Servers with Port 25 Open If you’re looking to send bulk emails using Linux servers, you’ve come to the right place! 🚀 Whether you’re running a business, a newsletter, or an email marketing campaign, using a Linux SMTP server with port 25 open can be an efficient and cost-effective solution. In this guide, we’ll walk you through:✅ Setting up an email server on Linux✅ Configuring SMTP for bulk email sending✅ Best practices to avoid spam filters✅ Troubleshooting common issues Let’s get started! 💡 ⚡ Step 1: Get a Linux Server with Port 25 Open Before you can start sending emails, you need a Linux VPS or dedicated server with port 25 open. Many cloud providers block port 25 to prevent spam, so you should choose a provider that allows it. 🔹 Recommended VPS Providers with Open Port 25 1️⃣ DigitalOcean – You need to request port 25 unblocking manually2️⃣ Linode – Allows port 25 but may require verification3️⃣ Vultr – May require manual approval for port 25 usage4️⃣ Contabo – Port 25 is open by default5️⃣ Hetzner – No restrictions on SMTP ports If your provider blocks port 25, you can use SMTP relays like Amazon SES, Mailgun, or SendGrid. 🛠 Step 2: Install and Configure an SMTP Server To send bulk emails, you need an SMTP server. The most popular options are: 📌 Postfix – Lightweight and easy to configure📌 Exim – Powerful and widely used on cPanel servers📌 CloudMTA – Best for high-volume email sending (paid) 🔹 Install Postfix (Recommended for Beginners) Run the following commands to install and configure Postfix: sudo apt update && sudo apt install postfix -y During installation, select “Internet Site” when prompted. Then, edit the Postfix configuration file: sudo nano /etc/postfix/main.cf Add or modify the following lines: myhostname = mail.yourdomain.com mydomain = yourdomain.com myorigin = $mydomain inet_interfaces = all inet_protocols = all relayhost = home_mailbox = Maildir/ Save and restart Postfix: sudo systemctl restart postfix sudo systemctl enable postfix ✅ Postfix is now installed and ready to send emails! 📩 Step 3: Configure SPF, DKIM, and DMARC for Better Email Deliverability To avoid your emails landing in spam, you need to set up SPF, DKIM, and DMARC. 🔹 Set Up SPF Record Add this TXT record to your domain’s DNS settings: v=spf1 mx a ip4:YOUR_SERVER_IP ~all   🔹 Set Up DKIM Install OpenDKIM: sudo apt install opendkim opendkim-tools -y Generate keys: sudo opendkim-genkey -s default -d yourdomain.com sudo mv default.private /etc/opendkim/keys/yourdomain.com/default.private Add the DKIM public key to your DNS as a TXT record. 🔹 Set Up DMARC Add this TXT record to your DNS: v=DMARC1; p=none; rua=mailto:youremail@yourdomain.com   ✅ Your emails are now authenticated and less likely to go to spam! 📊 Step 4: Test Your Email Server Send a test email using the following command: echo “Test email from my Linux server” | mail -s “Test Subject” youremail@gmail.com You can also use tools like Mail-Tester (🔗 Check spam score) to verify email deliverability. 🚀 Step 5: Use Bulk Email Software Now that your server is ready, you need software to send bulk emails. Here are some of the best options: 1️⃣ MailWizz – Paid software with powerful email marketing features2️⃣ Mautic – Open-source email automation tool3️⃣ Postal – Free self-hosted mail server4️⃣CloudMTA – High-performance commercial SMTP To install MailWizz, follow their official documentation: 🔗 MailWizz Guide 🛡 Step 6: Avoid Getting Blacklisted Here are some best practices to ensure your emails are delivered: ✔ Warm up your IP – Start by sending a few emails daily and increase gradually✔ Use a clean email list – Avoid spam traps and invalid addresses✔ Enable Unsubscribe Option – This prevents spam complaints✔ Monitor blacklists – Use 🔗 MXToolBox to check your IP reputation 📢 Conclusion Setting up a bulk email server on Linux requires proper configuration, authentication, and best practices to ensure good email deliverability. By following this guide, you can successfully send bulk emails using Linux without landing in spam! If you found this guide useful, share it with others who need a reliable email marketing solution! 🚀

Scroll to Top